
 By default, iTunes plays music in a full window, which displays all parts of the application: the navigation tree on the left, the list of songs (or TV shows, movies, audiobooks, podcasts...) on the right, as well as optional components like the MiniStore or the iTunes Browser. In some cases, you only need the core playback functions visible: this is the Mini Player. This tutorial explains iTunes' two miniplayer modes, and the various options associated with this feature. (This tutorial uses "Mini Player" and "miniplayer" interchangeably.)
Note that if you use Windows Vista, you can also minimize iTunes to the taskbar so that (unlike iTunes in Mini Player mode) iTunes remains visible without obscuring any other part of the screen; for more information, please see our Windows Vista tutorial.
Switching to iTunes Mini Player mode
To switch iTunes to Mini Player mode, click Switch to Mini Player under iTunes' Advanced menu - update: in recent versions of iTunes, the Switch to Mini Player item has been relegated to the View menu. The main iTunes window will shrink to a Mini Player window (or "iTunes miniplayer", as it is often called). If you opened multiple iTunes windows by double-clicking on a category or playlist's icon, these windows will remain open, in their normal state: only the main iTunes window switches to the Mini Player version of itself.
Keyboard shortcut: to switch to iTunes Mini Player, press Ctrl+M (Windows) or Command+M (Mac) - the Windows version of iTunes often requires that you hit twice a keyboard shortcut before it registers: if iTunes doesn't switch to miniplayer mode the first time, either repeat the keyboard shortcut, or choose Switch to Mini Player from the View menu.
The "Compact" iTunes Miniplayer
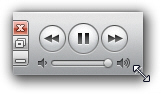
 By default, the iTunes Mini Player displays the current track information screen, the drag-able playhead, etc.
  Displaying the information screen is optional, and you can make the miniplayer even smaller by hiding it: to hide iTunes "information screen", drag the lower right corner of the Mini Player window inwards. This will give you a truly "Mini" player. This version of the Mini Player only displays the playback controls (the Previous, Next, and Play/Pause buttons) and iTunes' volume slider (alongside the Minimize, Restore/Maximize and Close buttons on Windows, and the three corresponding mini dots on Mac OS X).
Restore or resize the miniplayer
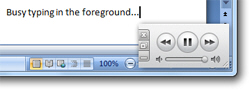
 To display again iTunes' information screen, simply drag the Mini Player's lower right corner rightwards. The width of the information screen is variable between a minimum and maximum width, which you can discover by dragging back outwards the lower right corner of the miniplayer window.
  To restore the Mini Player window to a regular iTunes window, click the restore button (Windows) or the zoom button (Mac). You're back to the regular iTunes window. The Mini Player's maximize button restores iTunes to its original window size (whether it was maximized or not).
Keep the iTunes Mini Player above other Windows
 You can force iTunes to float above other windows (while in miniplayer mode): disabled by default, this feature is supported by iTunes on both Mac and Windows. It allows you to maintain the Mini Player above any other windows; this is especially useful on Windows, where maximized windows use all the available screen real estate. (On a Mac OS X, you usually have free space on either side of the Dock, where you could park the miniplayer window without resorting to this option.) Note that "stay on top" option only takes effect, if enabled, when you switch to miniplayer mode: the full size iTunes window will continue to behave as a normal window which is hidden behind other application windows.
Maintaining the Mini Player above other windows can be enabled through Preferences: on Windows, go to Edit > Preferences; on Mac, go to iTunes > Preferences. The keyboard shortcut to open iTunes' preferences dialog on Windows is Ctrl+, (the comma key) and Command+, on Mac. This keyboard combination may seem odd, but it is well followed standard on Mac applications; (there is no such standard keyboard shortcut for program options on Windows.)
Enable or disable the floating iTunes miniplayer
 In iTunes' Preferences window, select the Advanced tab, and locate the Keep MiniPlayer on top of all other windows checkbox. Check or uncheck it; it is unchecked by default.
If you decide later on to prevent the iTunes miniplayer from floating above other windows, simply go back to the Preferences dialog, and uncheck the "Keep MiniPlayer on top of all other windows" checkbox.
(Depending on your version of iTunes, the word "MiniPlayer" is either spelled in one or two words, whether you look at the Preferences or the Advanced menu - now under the View menu.)