Several tools are at your disposal to enhance the playback sound of music, and other audio content in iTunes. The simplest is iTunes Equalizer. It works in much the same way as real-life stereo systems.
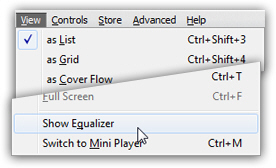
The iTunes Equalizer has its own window, hidden by default; unlike some of iTunes' other dialogs, the Equalizer lets you switch back and forth between it and iTunes (giving you room to experiment). To open the iTunes Equalizer, go to View > Show Equalizer.
Once you are done with the Equalizer, you can either close it, or ignore it and switch back to iTunes' main window.
Configure iTunes Equalizer Settings
The iTunes equalizer contains four sets of controls. The On checkbox is checked by default, and indicates that iTunes uses the sound equalizer's settings for sound output. You should leave it checked, and keep the equalizer's flexibility available.
The drop-down menu displays the current preset, if any was chosen, or "Manual", if you have moved one or more of the sliders to adjust the sound. iTunes comes with 22 sound presets, each targeting a particular sound "type". Some, like "Bass Booster" or "Bass Reducer", are self-explanatory; test the others to measure their effect on sound. Each preset corresponds to a combination of volume for each audible frequency, configured by positioning the sliders.
The iTunes equalizer's sliders enable you to boost or reduce a certain frequency: the column labeled "32" corresponds to low sounds (bass); the sound represented gradually reaches higher frequencies with the column labeled "16K". A "neutral", and somewhat stuffed sound, is achieved by leveling all sliders to 0 dB (decibels): iTunes has the "Flat" preset for this scenario.
 The leftmost slider, labeled "Preamp", allows you to boost or reduce the overall volume of playback, across the entire spectrum, by augmenting or diminishing the volume by an amount of decibels equal for all frequencies, regardless of their individual setting (and without overriding them).
A boost of more than 6 decibels (dB) on the Preamp slider will lead to scratching noise and distortion on most systems, especially at a louder noise volume.
Boost the sound of music or TV Shows without the iTunes equalizer
Speakers for desktop computers are generally powerful enough to be heard even in the noisiest environments; we just showed you an easy way to boost the volume of a song (or any other iTunes item that outputs sound, like audiobooks, iTunes U lectures, podcasts, etc.), using the iTunes equalizer. But it is useful to know, especially if you are using a laptop with weak speakers, that you can artificially boost the sound on an item-by-item basis (in addition to, not instead of, customizing your sound settings and volume with the equalizer). This equalizer tip is also useful for lesser-quality recordings.
 Right-click on the item whose sound volume you wish to boost, and choose Get Info, which will open the selected item(s) properties. Then, click on the Options tab: the first setting is labeled "Volume Adjustment", and displays a sound volume slider. By default, the slider is set to "None", which means that iTunes will not modify the sound settings of this particular item: to make the sound volume artificially louder on this item, drag it towards the "+ 100%" volume mark. Click OK to apply this new volume setting, and try playing back the item: you will notice a quite noticeable boost in sound volume if you dragged the slider to its maximum volume. Likewise, you can use the same steps to make a song or TV Shows less "loud", independently of the current iTunes volume level, the computer's volume setting, and the equalizer preset for Preamp.
 So, for low quality (or low volume) sound playbacks, you can (1) turn up the volume on your computer and make sure that iTunes' sound level is at its maximum, (2) boost the iTunes equalizer's Preamp setting to the maximum your speakers will allow without distorting sounds, and (3), boost the item's audio volume adjustment to its maximum. Any of these sound settings on their own produce a tangible increase in volume, but in combination with the sound equalizer, they will bring the quietest recording back to life!
Create and manage iTunes Equalizer presets (custom equalizer settings)
In addition to manually increasing or reducing the volume of individual frequencies, you can try the presets iTunes ships with; you may have to wait a few seconds before iTunes registers the change in sound preset in the Equalizer. Each time you change the sound preset, any manual settings will be replaced by the preset's configuration.
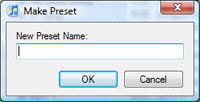 But iTunes lets you save your sound presets: once you are satisfied with a manual preset, choose Make Preset under the drop-down menu.
This will open the New Preset Name text input dialog: type a meaningful name for your custom preset, and hit Enter/Return. ("Cool sound" might not be too helpful in six month, when you forgot what you created the preset for.) Your custom preset will now remain available any time you start iTunes, just like iTunes' built-in presets.
Finally, iTunes lets you manage you existing presets (custom and built-in): choose Edit List... under the iTunes Equalizer's drop-down menu; the Edit Presets dialog will open, and let you rename and delete any preset listed.
Make custom iTunes equalizer presets easier to access
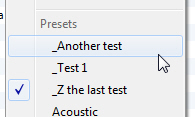 Any custom sound equalizer settings you save in iTunes will be mingled with other sound settings: to avoid mixing built-in equalizer settings and custom equalizer presets, as well as making your equalizer presets easier to access, here is a tip to make your saved presets appear at the top of the list. Prefix any custom equalizer preset with an underscore character ("_").
Since iTunes displays your sound equalizer presets alphabetically, all custom equalizer presets (or presets you renamed) starting with a character that comes before the letter "A", will appear at the top of the list of presets. (Unfortunately, iTunes does not behave this way for custom genres, and will ignore the pre-pended underscore.) Quick tip to make a custom iTunes equalizer sound preset appear above all others, regardless of the first letter of its name: make its name start with two underscore characters.
(You can use a hyphen, or any other character, but the underscore gets less in the way of quickly reading equalizer preset names.)
Assign iTunes equalizer sound presets to songs (or other audio content)
You can change the current equalizer preset for the content that currently plays in iTunes simply by going to View > Show Equalizer, and by picking an existing sound preset from the dropdown list. This equalizer setting will remain in effect for any audio content you play thereafter. But iTunes also lets you assign custom sound equalizer presets to particular songs (or any other audio content, but let's stick to music for simplicity's sake).
To assign an iTunes equalizer preset to a particular song, right-click on the song (you can also apply this setting to a selection of multiple songs or albums: see how to create complex selections in iTunes). From the context menu that appears, choose Get Info to access the properties of the song(s) you selected. If you selected multiple items, iTunes will display the following message, to which you should answer Yes: "Are you sure you want to edit information from multiple items?"
Then, click on the Options tab on the properties dialog that opened: right below the Volume Adjustment settings covered earlier is a checkbox labeled "Equalizer Preset", next to a dropdown menu that lists all the sound equalizer presets you currently have in iTunes. To attach and apply a sound preset to the item(s) selected, click on the dropdown and choose a preset, which will automatically check the checkbox (telling iTunes that, if you click OK, Equalizer Preset is one of the settings you would like to apply en masse).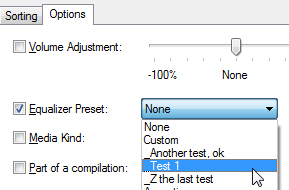
Do click OK when you are done: this has attached a particular sound iTunes equalizer preset to the song or group of songs you had selected. From now on, iTunes will automatically use the chosen sound preset when these songs play, regardless of the equalizer settings. Attaching custom equalizer presets to various groups of songs is a nice way to compensate for the quirks of audio recordings (over-emphasized bass, overpowering ambiance noise, etc.)
Restore the default sound equalizer setting for an iTunes item (or group of items)
 Should you change your mind later on, simply follow the same steps: right-click on the song(s), choose Get Info, and click on the Options tab. Then, check the Equalizer Preset checkbox, and choose "None" as an equalizer preset. When you click OK, iTunes will revert to its default behavior, which is to let the current equalizer preset be applied to the song that is playing!
Renaming standard iTunes equalizer presets
iTunes lets you baptize your own equalizer presets, but it also allows you to rename some of the built-in presets (that come with iTunes). Just as when you rename a custom equalizer preset, iTunes will confirm if you do want to update all songs (or other audio media) that are currently set to use this particular sound equalizer preset.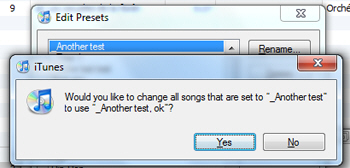
Automatically adjust volume playback (without the iTunes equalizer)
Some recent cars' stereo system comes with a feature that allows you to automatically adjust the volume playback based on the noise of your engine. iTunes has a similar feature, and allows you to compensate for the audio quality of the original recording. This avoids having your volume all of sudden jump up because the next album was recorded differently.
 To automatically adjust volume playback, open the iTunes Preferences: on Mac, go to the iTunes menu and choose Preferences (or hit the Command+, (comma) keyboard shortcut); on Windows, go to Edit > Preferences (or hit the Ctrl+, (comma) keyboard shortcut). Then, click on the Playback tab: the third checkbox reads "Sound Check - Automatically adjusts song playback volume to the same level" - it is unchecked by default. If you enable this option, iTunes will from thereon automatically ensure that the sound volume stays roughly equal, regardless of the album playing, and regardless of your other sound, volume, and iTunes equalizer settings or presets.
iTunes Equalizer Keyboard Shortcut
Unfortunately, Apple has not yet created a custom keyboard shortcut to launch the iTunes equalizer. On Windows, however, you can use keyboard accelerators to launch the iTunes equalizer with a couple of keystrokes: first, hit Alt+V to open the View menu, and then hit Q to activate the Show Equalizer menu item: (Notice the underlined letter "q" as a reminder)