 iTunes lets you sort your music (and other content) by any of the visible columns, and even multiple columns. There are even ways to sort in iTunes by multiple columns at once, although the functionality remains somewhat limited; in conjunction with playlists and smart playlists, filtering and searching, you should be able to sort your music however you like. In this tutorial, you will learn how to do a simple sort order, how to reverse the sort order, and how to sort by multiple columns.
Sort an iTunes playlist by a single column
 First, when we say "an iTunes playlist", this actually applies to your music library as well, which iTunes considers as a "mega playlist" for practical purposes. The easiest way to sort the songs currently visible is to apply a single click on the column by which you want to order your music. For example, to sort your music by song title, click on the Name column, which should be visible by default, and iTunes sorts the music visible by song name:
You can tell from the screenshot above, that the sort order is currently by Name (the Name column has a different background color). You can also tell that the content is sorted alphabetically (ascending order), because of the upward-pointing arrow.
Reverse the current sort order
Reversing the current sort order is as simple as clicking on the same column header another time: using our previous example, clicking once more on the Name column will sort your music by song name, in reverse order (descending order, from Z to A). iTunes updates the column header accordingly, and displays a downward-pointing arrow inside the column you selected:
 Tip: iTunes sorts numbers after letters, unlike some other applications. The "99 Times" song in the screenshot is now actually above songs whose name starts with a Z. The screenshot on the right shows you, when iTunes music is sorted by song name, in descending order, the transition between characters and digits.
The exception to this reverse-sort-order trick is the Album column, which has special functionality built-in to accommodate sorting by multiple columns.
Show more columns to sort by
 iTunes remembers which columns you want visible for your music library, as well as any playlist or smart playlist you have created: in other words, you can have a customized set of columns for each individual playlist, based on your needs. There are two ways to show or hide columns in a given playlist: either right-click on one of the columns and check, one after the other, the columns you want to make visible (or uncheck the ones you want to hide), and you are done. To test your settings, go to another playlist, and come back to the one you just edited: iTunes "remembers".
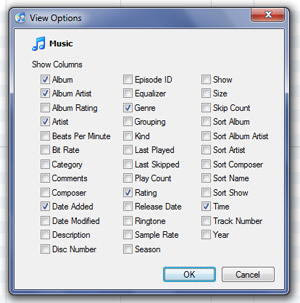
Another (quicker) way to show or hide multiple columns is to go inside the playlist (since these settings will be applied to the current playlist), go to the View menu, and choose "View Options". This opens a dialog window containing all the columns you can show:
Simply check the columns you want visible, and uncheck the ones you want hidden; then, click OK to apply the new setting and return to iTunes. (And remember that this setting only applies to the current playlist, not all your iTunes music.)
Sort by multiple columns at once in iTunes
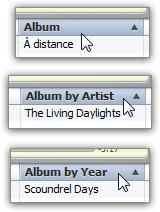
Recent versions of iTunes also include a special sorting functionality built into the Album column, which allows you to perform the equivalent of sorting by multiple columns at once: assuming that your music is currently sorted by a field other than Album, click on the Album column, and iTunes sorts your music based on album name; click a second time on the Album column, however, and iTunes sorts by "Album by Artist", a double sort that orders your music by Artist, and then sorts for each artist by Album name. A third click on the Album column sorts by "Album by Year" (and a last click resets the column to plain Album Sort).
Customize further the iTunes sort order, with Groupings
A more advanced tutorial will explain how to "Customize Groupings", to enable you to get more control over how iTunes displays your music, by adding custom information inside each album or song profile (using the Right-click > Get Info command).
