
In addition to all the settings you can customize on your iPod nano from the iPod itself, there are several preferences you can configure from iTunes, which pertain to how iTunes interacts with your iPod nano.
iPod nano options in iTunes
Here is the Options section of the summary screen you see when your iPod nano is displayed in iTunes: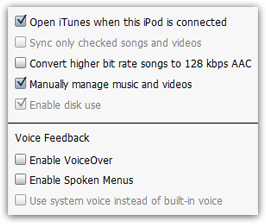
- Open iTunes when this iPod is connected — Unless you have disabled iTunesHelper, iTunes will automatically launch as soon as you connect your iPod nano into your computer (Mac or PC). If this setting is turned off (uncheck the checkbox), you will still be able to see your iPod nano inside iTunes, when connected, but you will have to manually open iTunes every time.
- Synchronize only checked songs and videos — This option determines whether iTunes should synchronize ("sync") all your music, or only the "Selected playlists, artists, and genres" you can pick from the iPod's Music tab in iTunes (covered in a later tutorial). This setting is disabled (grayed out, as shown on the screenshot) if you have chosen to manually manage your music and other content ↓.
- Convert higher bit rate songs to 128 kbps AAC — This obscure sounding preference simply means this: if you are transferring high quality audio content to iTunes, it can automatically sample down the sound quality. Why? Because lower sound quality will take less storage space on your iPod. Since the difference between 128 kbps sound and higher quality is marginal for most types of music and "normal" quality headphones, enabling this setting will save you some space on your nano (fit more songs) without noticeable loss of sound quality.
- Manually manage music and videos — This setting allows you to prevent iTunes from sync'ing en masse content on your iPod nano; if you only listen to a select number of items and media kinds on your iPod nano, this will give you more control over what to add or remove. This option is especially useful if your iTunes library is much larger than the current maximum 16Gb storage you get with an iPod nano. Unchecking this option, and letting iTunes synchronize everything, makes a lot of sense with an iPod Classic you are using as iTunes library backup.
- Enable disk use — With this option enabled, you can use your iPod nano as a portable Flash drive (though not recommended). But this allows you to navigate to your iPod nano's DCIM folder, for example, where all videos you shoot from it are stored.
- Enable VoiceOver — VoiceOver enables your iPod nano to read the track and artist names of the song currently playing; keep in mind that VoiceOver's extra audio content will take some additional space on your iPod.
- Enable Spoken Menus — This accessibility feature allows visually impaired and blind users to have their iPod nano read aloud the labels of each menu items (you can also make your iPod nano's text font larger).
- Use system voice instead of built-in voice — If you prefer to use your Mac or PC's electronic voice to read menus aloud and speak VoiceOver titles, check this box. Since VoiceOver is recorded in advance, rather than generated on-the-fly, storage space differences in using the built-in voice are negligible (in other words, you are not installing a new voice on your iPod nano by enabling this setting).
Once you are done configuring your iPod nano's options in iTunes, click on the Apply button in the bottom right corner (the button is hidden if no changes were made since the last time you edited them, if ever).