![]() By default, your iPad doesn't show the "Caps Lock" key on its on-screen (digital) keyboard, which means that whenever you want to type a long acronym -or sentence- in all-caps, you have to tap on the Shift key between each letter, which can become cumbersome. Note that this does not affect the external iPad keyboard, which (like a MacBook or regular Mac keyboards, does include a dedicated Caps Lock key). But since the on-screen iPad keyboard is software, you can customize as you like: this tutorial explains how to add a Caps Lock key to your iPad's on-screen keyboard.
By default, your iPad doesn't show the "Caps Lock" key on its on-screen (digital) keyboard, which means that whenever you want to type a long acronym -or sentence- in all-caps, you have to tap on the Shift key between each letter, which can become cumbersome. Note that this does not affect the external iPad keyboard, which (like a MacBook or regular Mac keyboards, does include a dedicated Caps Lock key). But since the on-screen iPad keyboard is software, you can customize as you like: this tutorial explains how to add a Caps Lock key to your iPad's on-screen keyboard.
Show the CapsLock key on your iPad for All-Caps typing
Follow these steps to enable showing the Caps Lock key:
 Click on the "Home" button, and navigate through Home screens to find the "Settings" icon, and tap on it.
- Once the iPad Settings screen loads, tap on the "General" settings on the left (should be automatically selected).
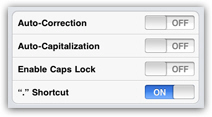
- In the 5th group of preferences, tap on the "Keyboard" button, and you'll see the following screen:

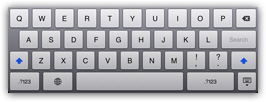
- The "Enable Caps Lock" button includes an On/Off switch, which displays "Off" by default; if you tap on it, the switch will turn to "On", and your keyboard will from now on allow you to press the Shift key to turn All-Caps mode to on. The screenshot below show the iPad keyboard with Caps Lock turned on:

- Notice how the arrows on the Shift keys on either side of the keyboard are blue: this indicates that your iPad keyboard is now in "all caps" typing mode, in other words that Caps Lock has been pressed.
Tip: here's how to type in all caps without adding / enabling the Caps Lock key for the iPad's on-screen keyboard. When you type something, press and hold Shift down while you type with your other finger.
