
 The first time you plug your iPod shuffle into your computer, using the audio-to-USB cable that comes with the shuffle, along with a free pair of earbud headphones, one or two things will happen: your computer should automatically recognize that you have plugged in a USB storage device, and a dialog of some sorts may appear on screen, based on your plug-and-play settings for Mac OS X or Windows 7 / Vista / XP. We assume in this tutorial that you have already downloaded and installed iTunes on your machine: if not, go first to the iTunes download page and get your free copy of iTunes (which ships with all Macs, so no installation needed unless you are using a Windows PC - more info in our iTunes Tutorial).
Getting started with your iPod shuffle in iTunes
Once iTunes is installed on your computer, and you plug in your iPod shuffle, it will automatically (and by default) launch, showing a page that looks like the screenshot above: this is the series of tabs in iTunes that allow you to manage playlists, audio content and settings of your shuffle right from your computer - unlike other iPods, which all have a screen, the only way to use and customize your iPod shuffle is by going through iTunes. Let's now walk you through the activation and registration process. When iTunes detects your iPod shuffle for the first time, it displays it in the left pane, under "Devices", with the default name of "IPOD", as shown below: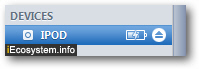
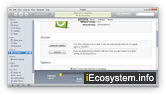
On the right hand side, iTunes will show a "Welcome to Your New iPod" screen; although you can "Register Later", we'll choose to click on the "Continue" button. Accept the terms of use and click on Continue once more.
Register your iPod shuffle with your existing Apple ID
The next screen will collect your "Apple ID" - this is the email address and password that you (may) already have associated with an iTunes account. The credentials are important, since music and audiobooks you purchase from the iTunes Store can only be played on an iPod (shuffle or otherwise) that is associated with that same Apple ID. With "Use my Apple ID to register my iPod" selected by default, enter your email address and password; otherwise, select "I do not have an Apple ID", choose your country, and proceed either way by clicking on "Continue" - and fill out your information on the next screen, as needed.
Note: the next screen displays the serial number for your iPod shuffle; you do not need to write it down, as iTunes will show it on the main screen whenever you plug your iPod into your computer.
You are just about done registering your iPod shuffle! The next screen will allow you to enter a name for your iPod, very useful if you own multiple iPod shuffle, especially if several members of your household have iPod shuffles as well. The screenshot below shows you how the name you type in will be shown on the left pane in iTunes (a later tutorial explains how to rename your iPod shuffle).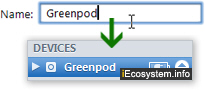
Finally, iTunes will let you choose whether or not to enable "VoiceOver" - this is the service that allows your iPod shuffle to pronounce aloud the name of songs and artists, as well as playlists, one you are on the go. A later tutorial will delve in more depth on this topic.
Tip: since you can change these settings later on, we recommend that you uncheck both the "Automatically sync songs to my iPod" and the "Enable VoiceOver" checkboxes. This will not only allow you to retain control over what goes on your iPod shuffle, but also, and mainly, avoid your running out of space very quickly, since the shuffle only comes with 2Gb (gigabytes) of storage space.
You have finished activating and registering your iPod shuffle! If you selected to use VoiceOver, you will have to agree to additional terms and download a small software update. As soon as you are done, iTunes will check for new firmware updates for the shuffle, and optionally offer to apply them. We recommend that you always install software updates suggested by iTunes (though it is often a good idea, for non-critical updates, to wait a week or two to make sure that Apple got everything right the first time).