
Since the iPod shuffle doesn't have a screen, unlike other iPods, it includes a feature called "VoiceOver", which allows the device to read aloud (through attached speakers or earbud headphones) track names, audiobook titles, and even playlist names. In this tutorial, we will show you how to enable or disable VoiceOver, and how to customize its settings through iTunes.
Enable VoiceOver on iPod shuffle
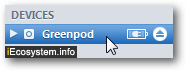 When you first register and activate your iPod shuffle, iTunes will offer to enable VoiceOver; if you opted out at that point, here's how you turn on VoiceOver after the fact. First, plug your iPod shuffle to your computer (Windows or Mac) - if iTunes doesn't automatically open, launch it manually, and select your iPod shuffle, which should be displayed in the left pane, as shown on the screenshot.
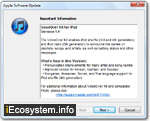 When the main iPod management screen loads on the right (the "Summary" tab), check the "Enable VoiceOver" checkbox; if this is the first time you enable it, you may see an "Apple Software Update" that will download the latest version of VoiceOver - this is normal, and safe to install.
Whether or not iTunes needed to download and install VoiceOver, it will start scanning the content of your iPod shuffle as soon as you (re-)enable the feature. You will know that the process is complete once the top information area of the iTunes window reads "iPod sync is complete - OK to disconnect".
Customize VoiceOver language for your iPod
On iTunes' main screen when your iPod shuffle is plugged in, you will find a dropdown menu under the VoiceOver checkbox, which has a certain language selected by default. If most of your music, audiobooks, or podcasts are in another language, you can change the default VoiceOver language to it using that dropdown menu: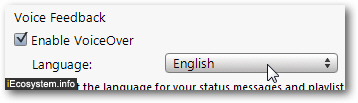
Tip: if you want to change the VoiceOver language for individual tracks, locate them in your iTunes library (i.e., before transferring them to your iPod), right-click on them, and choose "Get Info" from the context menu. Under the "Options" tab, pick another choice from the "VoiceOver Language" dropdown ("Automatic" means that iTunes will use your default language unless specified otherwise). Click "OK".
Disable VoiceOver on iPod shuffle
When you enable VoiceOver on your iPod shuffle, iTunes will create mini sound files that correspond to the names of the tracks, playlists, etc. currently stored on your iPod. This of course will add some storage space needs, which cannot be used for your other audio content. If you are not using VoiceOver, or are running out of space on your iPod, an easy way to restore some space is to disable VoiceOver. To turn it off, simply uncheck the "Enable VoiceOver" checkbox in iTunes, after having connected your iPod shuffle.
Tip: if you decide to re-enable VoiceOver later on, just check the "Enable VoiceOver" checkbox, and iTunes will automatically re-create the audio files that correspond to the current content of your iPod shuffle. (If not, just click on the "Sync" button.)